Adsense Rectangle Sidebar

December 31, 2011

New Years Eve

My family and I have a New Years Eve tradition. My parents never seem to make it remotely close to midnight, but they always seem to have some tasty food for dinner and champagne to drink. This year, I was in charge of the cooking. We had planned on crab, but the store was out by the time we got there. So instead, lobster! I also made some mini shrimp tacos, that were amazing, and I'll be making them again coming up soon. The 3 of us shared 2 lobster tails, and a mess of these tacos, plus a bunch of other appetizers and peach bellinis!


Mini Shrimp Tacos
Here's the recipe adapted from The Food in My Beard

Ingredients: (Sorry for lack of measurements, the original recipe doesn't have them. It's not too hard to eyeball it.)
Shredded cabbage
Mango
Onion
Garlic
Cilantro
Lime Juice
Tortillas
Mayonaise
Sriracha

Directions:
1. A cookie cutter works, but so does a 12-oz can. I brushed these rounds with vegetable oil.

2. Stick a toothpick through the ends of the tortilla round, to keep it into a loose bowl shape. Consult photos above. Cook them at 350 degrees for about 10 minutes. Then pull out the toothpick, they will keep their shape after being cooked.
3. The slaw was shredded cabbage, mango, onion, garlic, cilantro, and lime juice. The shrimp were lightly coated in mayo and a little Sriracha. Yum!

Lobster Tails with Clarified Butter
Here's the recipe adapted from Giada de Laurentiis
(Honestly, I could have done without the lemon in the butter, it would have been a little more savory without it. It's up to you, but it does produce a strong lemon flavor with every bite if you're ok with that)

Ingredients:
4 (each ½ to ¾-pound) Lobster Tailsthawed if frozen
¼ cup Clarified Lemon Butterplus 1 cup, recipe follows
Clarified Lemon Butter:
3 sticks Salted Buttercut into ½-inch pieces
3 Lemonszested


Directions:
1. Light the coals in a fire pit 1 hour before cooking or preheat a gas or charcoal grill.

2. Using kitchen shears or a sharp knife, cut through the top shell lengthwise. Cut a slit through the meat lengthwise taking care not to cut through the bottom shell. Gently pull the shells apart. Thread a skewer, starting at the underside base of the tail, along the inside of the bottom shell. Brush the meat with ¼ cup of the clarified butter. Wrap the lobster tails in heavy-duty aluminum foil. Bake for 12 to 15 minutes or until the lobster meat is opaque.

Butter:
1. Place the remaining clarified butter in a butter warmer or dipping bowl. Remove the meat from the lobster shells and dip in the Clarified Butter.In a small, heavy bottomed saucepan, heat the butter over medium-low heat. Pour the mixture into a 2-cup glass measuring jug. Let the melted butter stand for 5 minutes. Using a spoon, remove the foam from the top of the butter. Place the lemon zest in small bowl. Pour the clarified butter over the lemon zest and discard the milk solids left in the bottom of the jug.


December 25, 2011

Christmas Dinner

Once again, I decided to take charge of dinner, this time Christmas dinner. I also made breakfast, which was a breakfast sandwich, made from eggs, sausage, jalapeƱos, and cheese. We had several dinner dishes including, prime rib, garlic hasselback potatoes with herbed sour cream, store-bought rolls, and a salad I made. The prime rib and the potatoes were the highlight of the dinner, they both turned out delicious! I received a nice cast iron pot for Christmas, so I was able to use that to brown the meat in. And dessert was a pear and berry crisp, which was actually better as leftovers! Here are the photos...
Dinner, all plated up 
Cowboy Breakfast Sandwiches

Browning the prime rib

Prime rib right out of the oven

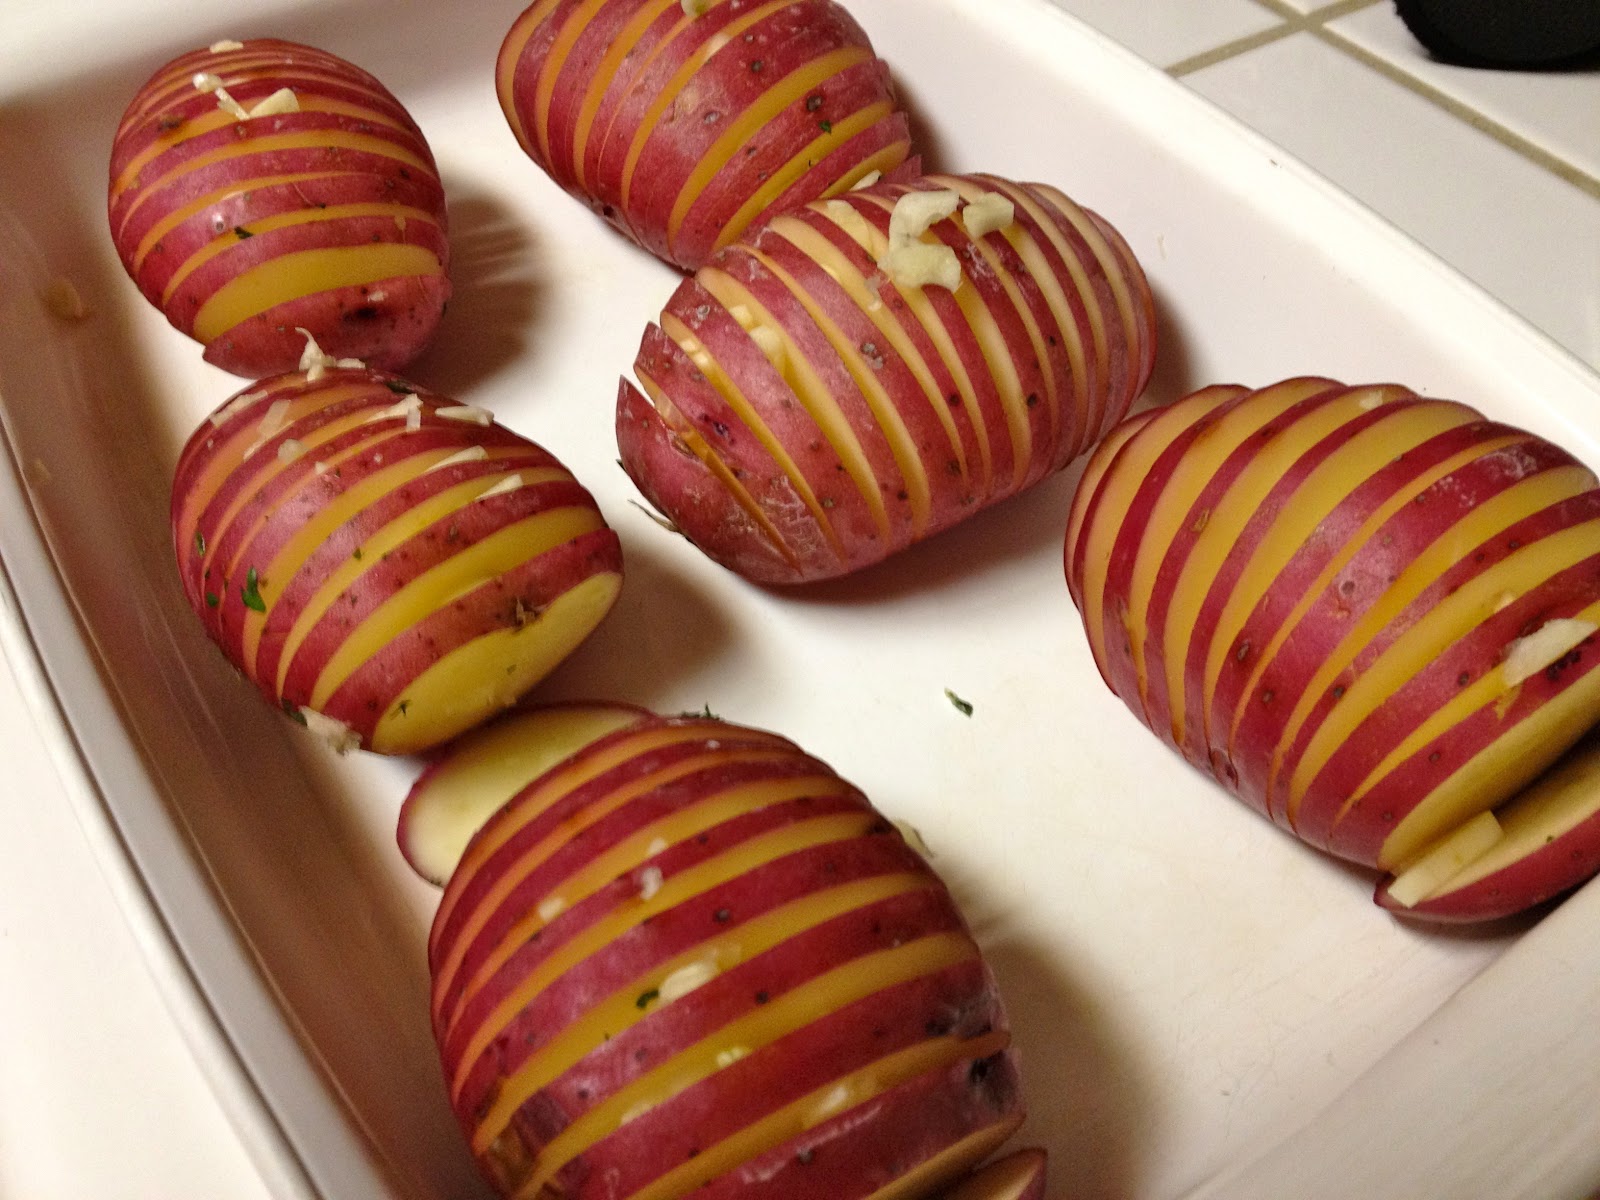
Garlic Hasselback Potatoes before they went in the oven

Pear and Berry Crisp with Vanilla Ice Cream

Cowboy Breakfast Sandwiches
Here's the recipe adapted from Pioneer Woman

Ingredients:
8 Breakfast Sausage Patties
8 Eggs
¼ cup Half-And-Half
Salt And Pepperto taste
1 Jar Pickled Jalapenos
Butter
8 Slices of Texas Toast
Mayo
Shredded Cheddar Cheese

Directions:
1. Start by frying patties of breakfast sausage.

2. While the sausage is frying over medium heat, crack a few eggs in a mixing bowl. Splash in ¼ cup half & half. Whisk together and then add plenty of salt and ground black pepper.

3. Flip the sausage and let it continue cooking.

4. Next, drain some jalapeƱo slices on some paper towels. (Warning: if you grill the jalapenos as demonstrated, make sure your stove has proper ventilation/exhaust.)

5. Dump the jalapenos onto a very hot skillet or griddle. Let them sizzle for a couple of minutes and then add a couple tablespoons of butter for flavor. Continue cooking for a couple more minutes and then set aside.

6. In the same skillet or griddle, melt a couple of tablespoons of butter and place a few slices of Texas Toast on top. The key here is to use plenty of butter as you grill the bread. When you flip the bread to the other side, go ahead and butter up the pan again.

7. Remove the sausage from the skillet when it’s completely cooked, then drain most of the grease from the pan and set sausage aside. Pour the eggs into the skillet and with a spatula, gently fold the eggs around, allowing them to cook.

8. When the Texas Toast is nice and grilled, spread whatever sandwich spread you’d like to use onto the bread. Top with a sausage patty, eggs, jalapenos, and cheese.

9. Finally top with another slice of Texas Toast and then return the sandwich to the warm griddle to thoroughly heat everything.

Prime Rib with Rosemary Salt Crust
Here's the recipe adapted from Pioneer Woman

Ingredients:
1 Whole Boneless Rib Eye (Ours was about 5 pounds and had bones in)
Olive Oil
2 Tbsp Tri-Color Peppercorns
Sprigs Fresh Thyme
Sprigs Fresh Rosemary
¼ cup Kosher Salt¼ cup Minced Garlic

Directions:
1. Preheat the oven to 500 degrees F.

2. Heat some oil in a large skillet over high heat. Sear rib eye until a nice dark golden color, 2 to 3 minutes per side.

3. Place the peppercorns into a bag and crush with a rolling pin. Shred the leaves from the thyme and rosemary sprigs. Mix the salt with the crushed peppercorns, rosemary leaves, thyme leaves and garlic. Pour olive oil over the rib eye and pour on the rub mix. Pat slightly to get it to stick to the meat. Roast for 20 minutes, then reduce the heat to 275 degrees F and roast until a meat thermometer registers 135 for rare/medium-rare, about 20 more minutes (the roast will continue to cook slightly after removing from the oven). Remove from the oven and let rest for 15 to 20 minutes before slicing.

Garlic Hasselback Potatoes with Herbed Sour Cream
Here's the recipe adapted from Sunny Anderson

Ingredients:
16 ounces Red New Potatoes
3 - 5 Garlic Clovesthinly sliced
4 Tbsp Unsalted Buttermelted
2 Tbsp Olive Oil
Kosher Salt And Freshly Ground Black Pepper
Herbed Sour Creamrecipe follows
Herbed Sour Cream:
½ cup Sour Cream
½ tsp Garlic Powder
1 Clove Garlic, minced
1 Tbsp Finely Chopped Fresh Parsley Leaves
Kosher Salt And Freshly Ground Black Pepper

Directions:
1. Preheat oven to 400 degrees F.

2. Using a wooden spoon as a cradle, place each potato in the spoon and make several parallel slits into each potato top making sure not to slice completely through. Place garlic slices between every slit. Toss in a medium bowl with butter and olive oil. Place on a baking sheet and sprinkle generously with salt and pepper. Bake until tops are crispy and potatoes are cooked through, about 1 hour. Transfer to a platter and top with Herbed Sour Cream.

Sour Cream:
Combine ingredients in a small bowl. Season, to taste, and refrigerate until use.

Pear and Berry Crisp
Here's the recipe adapted from Pioneer Woman

Ingredients:
Filling Ingredients:
4 Whole (To 5) Large Pears (Bosc Work Well)
1 cup of Mixed Frozen Berries
 cup Sugar
¼ tsp Salt
Topping Ingredients
1-½ cups All-Purpose Flour
 cup Sugar
 cup Firmly Packed Brown Sugar
½ tsp Cinnamon
½ cup PecansVery Finely Chopped
1 stick ButterMelted

Directions:
1. Preheat oven to 350 degrees.

2. Peel, core, and dice pears. Place into a bowl and stir together with berries, ⅔ cup sugar and ¼ teaspoon salt. Set aside.

3. In a separate bowl, combine flour, sugar, brown sugar, cinnamon, and pecans. Stir together. Drizzle melted butter gradually, stirring with a fork as you go until all combined.

4. Pour pears into a baking dish; top with crumb topping.

5. Bake at 350 degrees for 30 minutes.

6. Place pan on top rack of oven for an additional 10 minutes, or until topping is golden brown.

7. Serve warm with vanilla ice cream.

December 23, 2011

Avocado and Sardine Toast

This recipe sounds like the weirdest thing ever, but it's actually pretty tasty. Now, I'm not one of those people who loves sardines and anchovies, but I'm adventurous enough to try them if it's in something that otherwise sounds good. So, since my favorite chef, Alton Brown, made this as part of his diet show, showcasing recipes he made to help him lose 50 lbs., I decided to try it. The avocado mellows out the fishiness of the sardines, and the lemon juice gives some zing to balance the saltiness of the fish. If you're adventurous enough, try this recipe, you won't regret it!

Here's the recipe adapted from Alton Brown

Ingredients:
2 Tins Sardines In Olive Oil
Tbsp Finely Chopped Parsley Leavesdivided
1 Tbsp Sherry Vinegar
¼ tsp Lemon Zestreserve the lemon and cut into 4 wedges
Freshly Ground Black Pepper
4 (½-inch) Thick Slices Crusty Breadsuch as sourdough, country loaf or rye (I used Texas toast because we had it, and toasted it on both sides first)
1 Ripe Hass Avocado
Coarse Sea Salt


Directions:
1. Drain the oil from 1 tin of sardines into a small bowl and set aside. Drain the oil from the other tin into another small bowl and whisk in 1 tablespoon of parsley, vinegar, lemon zest, and black pepper, to taste. Add the sardines, stir to combine and set aside for up to 1 hour.

2. After 45 minutes, put a rack 3-inches from the broiler and heat the oven to the broiler setting on high. Brush each slice of bread on 1 side with the reserved oil. Put the bread, oil side up, onto a cooling rack set inside a half sheet pan and broil 2 to 3 minutes or until golden brown and crisp.

3. Halve the avocado and remove the pit. Smash the flesh in each half with a fork.

4. Spread the avocado evenly onto the toasted bread. Top evenly with the sardines. Pour any remaining dressing on top and garnish with the remaining parsley.

5. Season lightly with sea salt and serve with lemon wedges.

December 20, 2011

Pear, Blue Cheese, Brie and Honey Grilled Cheese

I found a wonderfully beautiful food blog called Grilled Cheese Social, and I have started saving a bunch of the recipes to make. I tried making one, which is called the Little Boy Blue, and it's a grilled cheese consisting of pears, blue cheese, brie, and honey. On the blog, the recipe calls for certain types of cheeses, which I just couldn't find, so I substituted, but I think mine turned out a little strongly flavored. The blue cheese I used overpowered all the other flavors. It may have turned out better with some gorgonzola instead. But no matter, here it is!


Here's the recipe adapted from Grilled Cheese Social

Ingredients:
1 tbs Of Crumbled Blue Cheese
½ tbs Of Honey
2 Pats Of Salted Butter
1 Slice Of Softened Brie Cheese
2 Slices of French Bread
2 Or 3 Slices Of Pear


Directions:
1. Take one slice of bread and pile on a few pieces of pear.

2. After that, gently sprinkle on some of the Blue Cheese. If it falls off the sandwich, don't worry - the next step will help keep the blue cheese on.

3. At this point, drizzle on some honey.

4. Just put on the top piece of bread and smear a pat of butter all up in those delicious little nooks and crannies. Then once your sammie is built, go ahead and melt the other pat of butter in your skillet by turning the heat to medium. Then when it's melted, gently place sammie in and try to sop up all the butter.

5. Once it's ready on one side, gently flip the grilled cheese and brown the other side as well.

6. Then when evenly golden and crispy on each side, take it out of the skillet and serve while it's all hot and gooey!

December 18, 2011

Lemon Pound Cake

I had a rare day off the other day, and decided to get a little crazy and bake a bunch of tasties. B mentioned that he had lemon pound cake he was munching on, so the next day I proceeded to make my own. It was sooo good! I had a problem making a glaze for it, when I realized there were dead bugs in our last remaining powdered sugar box (eww gross). But, the cake ended up tasting so good, there wasn't a need for a glaze. I tweaked the original recipe quite a bit, because reviewers were saying it needed some additional love. So, I made an (apparently) mediocre recipe, amazing! Once again...I know, how do I do it? I'm pretty sure it's magic : ) Or, some hard and fast food science; one or the other.
Pound cake redone, with glaze


Here's the recipe adapted from Gale Gand.

Ingredients:
1 ½ cups All-Purpose Flour
4 ounces Sour Cream
1 tsp Baking Powder
½ tsp Salt
1 cup (2 sticks) Buttersoftened at room temperature
1 ½ cups Sugar
4 Eggs
2 tsp Pure Vanilla Extract
¼ cup Lemon Juiceplus ⅓ cup
Lemon Zest (zest a whole lemon)

1-2 tsp Lemon Extract
2 cups Powdered Sugarfor glaze


Directions:
1. Preheat the oven to 325 degrees F. Butter a 6-cup loaf pan and line it with parchment or waxed paper. In a medium bowl, combine the flour, baking powder, and salt.

2. In a mixer fitted with a whisk attachment (or using a hand mixer), cream the butter. Add 1 ½  cup of the sugar and mix. With the mixer running at low speed, add the eggs one at a time. Add the vanilla.

3. Working in alternating batches, and mixing after each addition, add the dry ingredients, sour cream, lemon zest and ¼ cup of the lemon juice to the butter mixture. Mix until just smooth.

4. Pour into the prepared pan and bake until raised in the center and a tester inserted into the center comes out dry and almost clean (a few crumbs are OK), 65 to 75 minutes.

5. Meanwhile, make the glaze: In a small bowl, stir together the powdered sugar and the remaining ⅓ cup lemon juice until the sugar is dissolved.

6. When the cake is done, let cool in the pan 15 minutes (it will still be warm). Run a knife around the sides of the pan. Set a wire rack on a sheet pan with sides (to catch the glaze) and turn the cake out onto the rack. Peel off the waxed paper.

7. Using a turkey baster or pastry brush, spread glaze all over the top and sides of the cake and let soak in. Repeat until the entire glaze is used up, including any glaze that has dripped through onto the sheet pan. Let cool at room temperature or, wrapped in plastic wrap, in the refrigerator (Well wrapped, the cake will last up to a week). Serve at room temperature, in thin slices.

December 14, 2011

Enchiladas

We had a bunch of canned enchilada sauce around the house, so I gathered up the ingredients to make enchiladas. You may remember I made white chicken enchiladas previously, which I think I liked better than these. I made this recipe with ground beef, but I think the white sauce makes for a more flavorful enchilada, but these would have been better with maybe rice or something else.


Recipe adapted from The Pioneer Woman

Ingredients:
For The Sauce:
1 Tbsp Canola Oil
1 Tbsp All-Purpose Flour
1 Can (28 Ounce) Enchilada Or Red Sauce
2 cups Chicken Broth
½ tsp Salt
½ tsp Ground Black Pepper
2 Tbsp Chopped Cilantro
For The Meat:
1-½ pounds Ground Beef
1 Whole Medium OnionFinely Diced
2 Cans (4 Ounce) Diced Green Chilies
½ tsp Salt
For The Tortillas:
10 Whole (To 14) Corn Tortillas
½ cup Canola Oil
To Assemble:
3 cups Grated Sharp Cheddar Cheese
½ cup Chopped Black Olives
1 cup Chopped Green Onions
½ cup Chopped Cilantro


Directions:
Step #1 – The Sauce

In a large saucepan over medium heat, add oil and flour and whisk together to make a paste, cooking for one minute. Pour in the red sauce, chicken broth, cilantro, salt and pepper. Bring to a boil. Reduce heat and simmer 30-45 minutes.

Step #2 – The Meat

Brown the meat with onions in a skillet. Drain off fat. Stir in 2 cans diced green chilies and seasoned salt. Set aside.

Step #3 – Tortillas

Heat canola oil in a small skillet over medium heat. One by one, using tongs, fry tortillas in oil until soft, not crisp – about 30 seconds per side. Remove to a paper—towel lined plate. Repeat until all tortillas have been fried.

Step #4 – Assembly

Preheat oven to 350 degrees. Pour ½ cup red sauce in bottom of baking pan. Spread to even out. Dip each tortilla into red sauce, then remove to work surface. Spoon meat, a little grated cheese, a little black olives, and green onions in the center of tortilla. Roll up and place, seam down, in baking pan. Repeat until pan is filled. Pour extra red sauce over enchiladas. Top with remaining cheddar cheese.

Bake for 20 minutes or until bubbly. Sprinkle cilantro over enchiladas before serving.

December 13, 2011

Sliders

If you have never made sliders, I highly recommend this recipe. You may look at the ingredients and think "heavy cream?!" but trust me, it's exactly what ground beef needs for this recipe. It keeps it moist and adds that little bit of extra fat to make the burgers juicy and tasty. I also attempted to make caramelized onions to top the sliders with, but I walked away for too long, and ended up burning them. I think my favorite way to top these is with some gorgonzola cheese, sliced red onion, and some Sriracha mayo. Just mix a couple tablespoons of mayo with a few squeezes of Sriracha (adjust to your heat tolerance level), stir and spread on the slider buns.


Recipe adapted from The Pioneer Woman

Ingredients
pounds Ground Beef
2-3 Tbsp Heavy Whipping Cream
6 Dashes Worcestershire Sauce (Less If You Prefer)
1/2 tsp Kosher Salt
Freshly Ground Black Pepper
8 Whole Dinner (Or Slider) Rollssplit
Carmelized Onionsto top with
Gorgonzola Cheeseto top with
Sriracha Mayoto top with


Directions:
1. Preheat the grill to medium heat.

2. Mix the ground beef, heavy cream, Worcestershire and the salt and some pepper in a bowl. Use your hands to thoroughly mix the ingredients. Form ¼ cup of the meat mixture into patties, making 12 patties total. Make an indentation with your thumb to keep the patties from plumping too much when they cook.

3. Grill the sliders until just cooked through, 2 to 3 minutes per side. Remove from the grill and pile on a platter.

4. Toast the halved buns on the grill. Place the sliders between the buns and serve immediately.

December 10, 2011

Zapp's Cajun Dill Gator-Tators

In case you missed it, my favorite podcast, The Morning Stream, I listen to every Monday through Thursday, has been doing foreign food testing, which listeners have been sending them food to try on the show. They've been doing it now for about 2 months, and being the food lover I am, I am thoroughly enjoying this segment of the show. So, I decided to track every food they tried, and what the consensus was on the food, and where you can buy it. You can view this here.
These were very dilly in flavor. As with all of my chip tastings, these bags are pretty big and tough to eat the whole thing in one sitting. But, if you had some onion dip with these, it would be amazing. I don't think these were my favorite, out of all the ones I've tried so far, but they are definitely a flavor to try once. That is if you were buying a few flavors from Zapps. So if you like dill flavored foods, try these!

December 6, 2011

President's Choice Buffalo Wings and Blue Cheese Chips

In case you missed it, my favorite podcast, The Morning Stream, I listen to every Monday through Thursday, has been doing foreign food testing, which listeners have been sending them food to try on the show. They've been doing it now for about 2 months, and being the food lover I am, I am thoroughly enjoying this segment of the show. So, I decided to track every food they tried, and what the consensus was on the food, and where you can buy it. You can view this here.

These chips come from Canada, and cost a fortune to ship, more than the chips themselves! I ordered them from this website in case you wish to order them for yourself. They are pretty expensive to ship, but they are pretty good. They have a great spicy, tangy flavor, just like you're eating buffalo wings and blue cheese dressing. They look like Ruffles, and would probably be great with some kind of sour cream dip. They're pretty big bags, and I ordered 3, and I've only gone through most of one so far. If you like buffalo wings, and feel like paying a lot in shipping, get these! So tasty and better than many of the chips in the store at the moment. The downside was that they hadn't been packed tight in the box, and almost all the chips are in small pieces. Tasty pieces!


December 3, 2011

Zapps Voodoo Chips

In case you didn't hear, my favorite podcast, The Morning Stream, I listen to every Monday through Thursday, has been doing foreign food testing, which listeners have been sending them food to try on the show. They've been doing it now for about 2 months, and being the food lover I am, I am thoroughly enjoying this segment of the show. So, I decided to track every food they tried, and what the consensus was on the food, and where you can buy it. You can view this here.

The next flavor I tried from my mixed grab bag of chip flavors from Zapps, was the Voodoo flavor. The flavor comes from when an employee moved a bunch of spices, they dropped and he liked the taste the mixture and they used it on the chips. Warning though, this flavor is quite strong but tasty. I tried this chip first, and didn't like it all that much. But I came back to it, and liked it more than I did the first time. I liked the Spicy Creole Tomato a little better, but this flavor is great too. It's difficult to explain how these taste, but it's like a creole spice mixture that's a strong, but tasty flavor. Definitely try these if you order some chips from the Zapps website!


Zapps Spicy Creole Tomato Chips

My favorite podcast, The Morning Stream, I listen to every Monday through Thursday, has been doing foreign food testing, which listeners have been sending them food to try on the show. They've been doing it now for about 2 months, and being the food lover I am, I am thoroughly enjoying this segment of the show. So, I decided to track every food they tried, and what the consensus was on the food, and where you can buy it. You can view this here. After doing all this research on what they tried, I just had to order some of the food items to try myself. The first of these was Zapps Spicy Creole Tomato Chips.


These chips are amazing! Spicy kick at first, with a tomato-y finish. I gave the second bag I ordered to B, and I was kind of sad I did! I want them all to myself! I almost finished the bag I have, there's just a few scraps left at the bottom of the bag. If you decide to order any chips from Zapps, I highly recommend this flavor, and it's a limited edition so get them fast!